Sunday 11 July 2021

How To complete Uninstall Oracle Database 11g/12g from windows

AS we know Oracle database is very common & useful product but some time it create problems. There are may unknown  issue occurred when we try to uninstall &  install it again. Before re-installation, it must be cleaned from system every where. Many time Sysadmin need to format the system to reinstall the Oracle. We get lot of queries to uninstall to the organization. Some how we clean up the oracle & reinstall. it work fine.

Most of time issue come due to incomplete uninstall of previous Oracle. If we install the new setup then we need to confirm that previous version is properly uninstall & no more file left in system. Go through the complete article for uninstall oracle. It will help to save your unnecessary work to clean and deliver the task in optimal time.

Step1

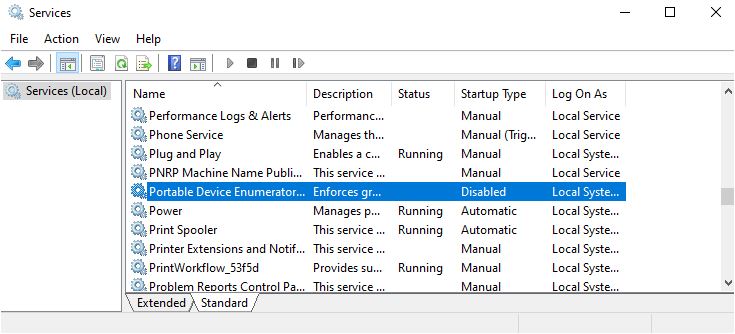
First, Go to Start -> Run -> Services.msc, locate all Ora* services. disable & stop them

 Step 2

Uninstall all Oracle components using the Oracle Universal Installer (OUI)

DEinstall Products One by one

Oracle universal installer

 Step3

Go to Run window and type “%APPDATA%” with out double quotes and press enter.


Delete the Oracle named folder & sub-folder.


Step 4

Delete from Registry complete


HKEY_LOCAL_MACHINE/SOFTWARE/ORACLE

HKEY_LOCAL_MACHINE\SOFTWARE\Wow6432Node\ORACLE on 64bit


Step 5

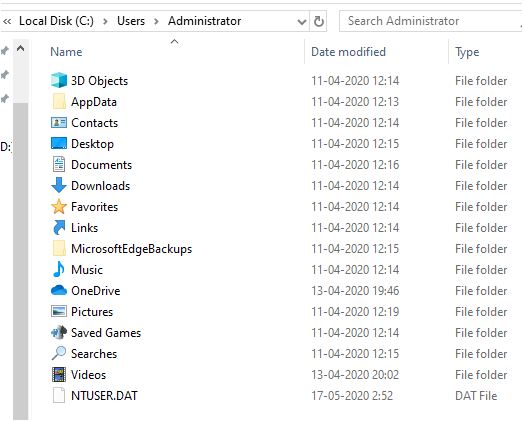
Delete ORACLE_BASE directory. (i.e C:\Oracle) 

Delete the directory C:\Program Files\Oracle.


Step 6

Delete temp Files & Disk cleanup for C drive.  Click here check step 1-4 for disk cleanup.


Step 7

Now Restart the system & delete services related to Oracle

Delete any references to Oracle services/components in the following registr

Path: HKEY_LOCAL_MACHINE/SYSTEM/CurrentControlSet/Services/. 

find key entries starts with “Ora” which are related to Oracle and delete all.


It is always recommended to restart a machine on completion of software install / uninstall process.

Share your queries through comments,Happy to resolve your Issue. at earliest.


Wednesday 30 June 2021

How to fix there are currently no logon servers available


Error:

There are currently no logon servers available to service the logon request

The error message "There are currently no logon servers available to service the logon request" usually indicates that a client computer is unable to connect to a domain controller in order to authenticate a user account. Here are some potential causes and solutions for this issue:


1.Network connectivity issues:

Make sure that the client computer has a working network connection. connected to WIFi/LAN connection properly. Restart system  & check. and that it can communicate with the domain controller(s). Check the IP address settings and DNS settings to ensure that they are correct.

2.Network Reset:

Usually when this error come you will not able to login with domain ID. you need to login with last login user or buid-in Administrator account or LAPS password used in organization. Once you able to login try to reset network . you can try below two command:

netsh winsock reset

netsh int ip reset

3. DHCP server not available

Might be case that DHCP server not allocating IP to system . That case you may get APIPA-  IP 169.254.x.x. You need to check with Network people for this & get it fixed. You can try below command to IP release & renew.


ipconfig /release 

ipconfig /renew

4. Try to set manual/Static IP & DNS server entry to system. 

Below are the step to set Static IP for system/server:
1.Click on the Start button and select Settings.
2.Click on Network & Internet.
3.Click on Ethernet or Wi-Fi, depending on your network connection.
4.Click on Change adapter options.
5.Right-click on the network adapter you want to configure and select Properties.
6.Scroll down and select Internet Protocol Version 4 (TCP/IPv4) and then click on Properties.
7.Select "Use the following IP address" and enter the IP address you want to use. This should be an IP address that is within the same subnet as the other devices on your network.
8.Enter the Subnet mask and Default gateway information as provided by your network administrator or Internet Service Provider.
9.If needed, enter the DNS server information, which is also provided by your network administrator or Internet Service Provider. 10.Click OK to save the settings.
Once you have completed these steps, your computer should be configured to use the manual IP address you specified. Keep in mind that if you are on a network with DHCP enabled, your manual IP address configuration may not work properly, so be sure to verify with your network administrator that the IP address you are setting is available and not already in use.

5. W32Time:

Make sure NTP service-W32Time time on your DCs and clients match correctly.It must not differ more than by 5 mints.

6. Netlogon service on DC

Make sure Netlogon service running on DC.  restart the service on DC & dependent services.

7. Hostfile entry need to verify

Due to some wrong entry in hostfile entry. DNS server is not reachable. Check & delete entry accordingly.


 On my best practice, In this article highlighted the  area where you can check & troubleshoot for Error no logon server. Hope you get solution & fixed for this.

Tuesday 29 June 2021

How to Prevent Users to Install Removable Devices in Windows

In the organization we prevent auto installation to secure the system to run malicious file.We have in-build policy to restrict the device Installation.This policy setting allows you to specify a list of Plug and Play hardware IDs and compatible IDs for devices that Windows is prevented from installing. This policy setting takes precedence over any other policy setting that allows Windows to install a device.

If you enable this policy setting, Windows is prevented from installing a device whose hardware ID or compatible ID appears in the list you create. If you enable this policy setting on a remote desktop server, the policy setting affects redirection of the specified devices from a remote desktop client to the remote desktop server.

If you disable or do not configure this policy setting, devices can be installed and updated as allowed or prevented by other policy settings. 

We prevent USB or any device auto installation with two method

Method-1 Group Policy setting

Method-2 Registry setting


 Method-1 Group Policy setting

Go to Run(Win+R) type gpedit.msc (make sure login with admin account)

Computer configuration->Systems->Device Installation-> Device Installation Restriction


 Method-2 Registry setting

Go to Run(Win+R) type regedit (make sure login with admin account)

HKEY_LOCAL_MACHINE\SOFTWARE\Policies\Microsoft\Windows\DeviceInstall\Restrictions

DenyRemovableDevices DWORD

(delete) = Enable
1 = Disable


Monday 28 June 2021

How to enable blocked USB/CD/DVD ROM Drives in Windows-10


Today's time every  organization  tried to secure the system to get unauthorized access. Many time user try to connect Pen drive or any USB & found it is blocked by organization/school/collages. If we connect mobile it will allow for charging but you can't access for file transfer. Admin must block USB/ CD Rom to  prevent the data theft. There are may ways you can enable or disable the USB.


1. Group policy setting

2. Services

3. Registery setting

4. Device Manager 

1. Group Policy setting

Go to Run(Win+R) type gpedit.msc (make sure login with admin account)

Computer configuration->Systems->Removable storage Access->and change settings same as below:
 

Enable: Disable the USB access.

Disable/ Not configure: Enable the access


2. Portable Device Enumerator Services

 Enable for access USB & disable for block 


 3. registry setting


Computer>HKEY_LOCAL_MACHINE>SYSTEM>CurrentControlSet>Services

HKLM->system->current control set->services->CDFS
•    Change the value of start to 3 for Enable & 4 for disable
 

HKLM->system->current control set->services->CDROM
•    Change then value of start to 3 for Enable & 4 for disable

 HKLM->system->current control set->services->USBSTOR
•    Change then value of start to 3 for Enable & 4 for disable


4. Device manger


Go to Start and type Device Manager>> right click>>run as Administrator

 You can check  below setting to enable or disable the USB driver as below :


NO  matter what USB blocked. You can check above all step cross verify the USB  setting for Enable/ Disable the USB / CD drive. I tried all setting my system  USB Unblocked. Although 1 more setting for  Device installation restriction. click here to check for setting.

Tuesday 15 June 2021

Only part of readprocessmemory or writeprocessmemory request was completed

The User Profile Server service failed the logon. User profile can't be loaded and logoutThe User Profile Server service failed the logon. User profile can't be loaded and logout

 When we work on  windows system. Many times we encounter the above screenshot error. I also got the same issue. I was trying to login my system with new user account but  It  suddenly gave me  error-" The User Profile Server service failed the logon. User profile can't be loaded and logout".

While login with other user account which is already login profile present, did not get any error. Also I tried to run any application with different user to create my profile  and got  error- "Only part of readprocessmemory or writeprocessmemory request was completed".

 This error also come when we are installing any application. I am pretty sure error come due to some read write process save data on os. Might be some background process running which is not allowing to read or write the request on OS label issue.

It was very tough to me find out the way to  create new create new user profile. I tried my best to resolve this issue.  

On troubleshoot part:-

 I Tried for Reboot system which doesn't work at all. also tried to repair scan disk.  Clear temp files. window restore to last good configuration. Still not work. I was totally frustrated. Finally got the solution.

Solution:-

You can try to delete INT Temp File

C:\Users\default\AppData\Local\Microsoft\Windows\Temporary Internet Files

Note:- Default is hidden folder you need to view the hidden item as below folder setting.


Once the bad temporary file is removed, you can try for login. Now you can not see the error anymore, if it still appears then Try below file replaced with working system.


C:\Users\default


 I think while doing above only solution will help you a lot to save your busy schedule time.  The purpose of my blog to get optimal solution for last protocol. you don't require other more solution to go other site. Keep  visit for more  solution for Windows/Linux/Servers and many more.

Sunday 30 May 2021

How to Disable Shut Down, Restart, Hibernate and Sleep in Windows 10

Many user use the power option to Shut Down, Restart, Hibernate and Sleep.  Usually we take remote to physical machine or virtual machine & shutdown the system.  It very difficult to start the physical machine because it required to do physically. 

Admin can restrict user to use power menu option to avoid shutdown. There are different ways to disable the power option, so that user can not  do it self to Shut Down, Restart, Hibernate and Sleep in Windows 10.  If we disable the power menu option available in Windows. It reduces the workload of  Admins.


This will not affect the Alt+F4 Windows dialog & CMD command to Shut Down, and will not prevent users from using other methods to sleep, hibernate, shut down, or restart.


After applying the policy. Use can't see the option to Shut Down, Restart, Hibernate and Sleep as below screenshot.


Perform any below method to Enable or Disable Power option.  You can apply any one of then to restrict.  I as System Admin preferer method 2 to use to restrict all user to use Power option.

Method 1.

Enable or Disable Shut Down, Restart, Sleep, and Hibernate in Power Menu for All Users in Local Group Policy Editor

1.1 Edit group policy  Go to Run(Win+R) type gpedit.msc

1.2 Go to Computer Configuration>> Administrative Templates>> Start Menu and Taskbar

Remove and prevent access to shutdown, Restart, Sleep and hibernate commands- change to enable for restrict. 


1.3  change not configured or disable - To show option

       Enable- To disable option


Method 2

Enable or Disable Shut Down, Restart, Sleep, and Hibernate in Power Menu for All Users using a REG file


2.1 open registry Editor  as admin- Go to Run(Win+R) type regedit


2.2   By default no entry will be found. you need to  create Go to path

[Computer\HKEY_LOCAL_MACHINE\SOFTWARE\Microsoft\Windows\CurrentVersion\Policies\Explorer]
"HidePowerOptions"=_

1 -To Disable option

0- To Enable option


xxxxxxxxxxxxxxxxxxxxxxxxxxxxxxxxxxxxxxxxxxxxxxxxxxxxxxxxxxxxxxxxxxxxxxxxxxxxxxxxxxxxxxxxxxxxxxxxxxxxxxxxxxxxx

User  can use  above 2 method to restrict but user  below command  to Shut Down, Restart, Hibernate and Sleep in Windows 10

Method 1

 ALT+F4


Method 2

Go CMD type  below command as per requirement

To shut down system                  Shutdown -s

To Restart system immediately        Shutdown -r -t 1

To Abort a system shutdown           Shutdown -a


Wednesday 30 September 2020

How to fix- Automatically Log off Idle Remote Desktop Sessions in Windows

 Many Times we take Remote(RDP)  & if it is more 30 mint. login account get disconnected & your unsaved data get lost. It is not your fault but due to data loss, I feel angry on myself.

This feature is enabled In many organization. An idle/ inactive session consume CPU resources and memory.  let us take an example- In case of server, 100 users are login but at a time only 3-4 user work. Since feature for  limit RDP IDL session is not configured so the user who haven't logout their active session consume huge no. CPU & RAM Utilization. The best way to kick out the IDL user from login session which helps alot to save RAM & CPU to overload.

If the feature enabled in system. Regularly we get this popup. Normally don't see such since we are not using RDP.


For solution, User must click to ok or provide input otherwise session will time out & login account get sign-out/Logoff in 2 mint.

If you want to turn off the feature from you system/Server then Configure Timeout and Reconnection Settings for Remote Desktop Services Sessions


Go to Run(Win+R) type gpedit.msc (make sure login with admin account)

Computer Configuration > Administrative Templates > Windows Components > Remote Desktop Services > Remote Desktop Session Host > Session Time Limits

Now double click on click on set time limit for active Remote Desktop Services Sessions
Disable or not configure or enable accordingly for limit the time


  If you want to  stop this feature either not configured to all set time limit as shown in screenshot.


Now My system not get auto signout :)

Saturday 19 September 2020

The system can't find the file specified. C:\Windows\system32\\mstsc.exe.MUI


The system cannot find the file specified. C:\Windows\system32\LANG_NAME>\mstsc.exe.MUI 

Yesterday My system got windows Update. Now I am trying access Remote- MSTSC & getting above Error after windows restart. I am using latest windows 10 build version 1909. I don't know how this thing happened. I uninstalled the latest patch installed but it doesn't work.  I don't want to reinstall windows or restore to last good configuration. I tried a lot to find the solution.

There  are some system file missing or got corrupted. So I tried to file  as  shown in error.

Tried below file replaced with working system & get issue resolved.

Go to path C:\Windows\System32\en-US  & replace to file to working system


c:\windows\system32\en-us\mstsc.exe.mui
c:\windows\system32\en-us\mstscax.dll.mui


Finally issue resolved :) 


Monday 8 June 2020

How to fix- The Group Policy Client service failed the logon. Access denied

The Group Policy Client service failed the logon. Access denied
 Many time we  Encounter the  above error -The Group Policy Client service failed the logon. Access denied. this error comes when user profile get corrupted or User profile permission issue.   For that we need to login the system with local system admin.


As per my Experience,  Resolution for this will different for different system. I am just providing in sequence to apply one by one and check. It will 100% work.


1. Enable Inheritance & replace all child object permission with inheritable object
2. Restart Group Policy Service and Reset Winsock
3. Replace NTUSER.DAT with working system
4. Delete user account


1. Enable Inheritance & replace all child object permission with inheritable object

Many Times, There is issue access permission issue to folder and sub folder in user profile for that we need to give permission as parent folder. This best way to give access permission at single to to all by enabling inheritance to folder security

1.1 go to c:\users\%Userprofile%  right click Properties-> security tab


1.2  click advance


1.3 Click Enable Inheritance.  and check the box to replace child object with inheritable permission. If this button is not available, that means that Inheritance is already enabled.


1.4 click yes and continue

 Many times some folder is in use. it will ask for continue. Just click and proceed for continue.


 Now log off and try for login the system with profile having issue. Most of time it work. If it not work then try other method

2. Restart Group Policy Service and Reset Winsock

 Many time by restating the service-Group Policy client

2.1 Go Run( Win+R ) Type services.msc

2.2 Restart the service Group Policy client and Change its Startup type to Automatic, Click on the Start button, and then Apply > OK.


2.3 Now open CMD  as admin Type the  command and hit enter.netsh winsock reset


3. Replace NTUSER.DAT with working system

Now copy the NTUSER.DAT file from other working system or other profile present in system

3.1 File is hidden so you need to enable to show hidden item & file extension. Just go to user profile and view on top and check the box for hidden item.


3.2 Once Hidden item enabled, you will able to see the NTUSER.DAT file at last


3.3. Now copy and past in other user profile having issue. you may copy the same file from other system as well.


4. Delete user account

Note:- Before deleting User Profile you must take backup files. It may leads to data loss after deletion of profile.
Now above all 3 method not work then Last option we have only to delete user Profile

4.1 Go to run type sysdm.cpl and  Advance tab --> User Profile-->settings
 

4.2 In the User Profiles dialog box, select the profile of your affected user account and click on  Delete. 


Now Delete the profile. IT may take time depends on size of  Profile.


Sunday 31 May 2020

51 Shortcuts for SysAdmin to Boost Productivity

Today's Work Environment we have to support more project then we expect. Due to Limited System Admin  in office increase the workload with you. To maximize the Productivity, we need to do smart work. For that we need to get shortcuts process to skip multiple clicks.

In This article you will get all shortcuts of windows to Boost Productivity and  save Valuable time.
Here I am skipping basic short like cut copy past Win+L which every SysAdmin Know.

Note:- All command work in command Promt(cmd) & run Windows
Shortcut Commands Purpose
appwiz.cpl Uninstall or change program
inetcpl..cpl Internet option 
powercfg.cpl power Option
firewall.cpl firewall setting
main.cpl mouse Pointer option
ncpa.cpl Network connections
compmgmt.msc computer Management
sysdm.cpl system Properties
gpedit.msc Local group Policy editor
secpol.msc Local Security Policy
printmanagement.msc Printer Management
diskmgmt.msc Disk Management
lusrmgr.msc local group & user setting
devmgmt.msc device Manager
fsmgmt.msc share Folders
tpm.msc TPM  Management
services.msc Service Management
mstsc Remote Desktop connections
msra Windows Remote assistance
cmd command Prompt
poweshell Power shell
printui printer User Interface
rstui system restore
recdisk recovery tool
dxdiag direct X diagnostic tool
dfragui disk Fragment User Interface
sdclt Backup & Restore
computerdefaults computer default settings
mspaint Microsoft Paint
notepad NotePad
lpksetup Install-Uninstall display language
taskmgr task Manager
osk keyboard
sethc (press 5 times shift key) Sticky key setting
narrator Narrator
magnify Magnifier
quickassist Quick assist window App
write Word Pad
calc Calculator
msdt Microsoft support diagnostic tool
regedit registry editor
winver Windows version
UserAccountControlSettings Change user account Settings
wscui.cpl Security & maintenance
eventvwr Event Viewer
control system System properties
Perfmon performance Monitor
resmon Resource Monitor
msinfo32 System Information
cleanmgr clean management
wf.msc windows Firewall